Mastering the Vision that Popped into my Head: Colour Gels in Small Spaces
- Nirvaani Singh

- Jan 15
- 4 min read
Have you ever had an idea pop up in your mind in full clarity while you're awake, even before you picked up the camera? Well, that was me. It hit me in my core. "I need to do this shoot!" I screamed in my head.
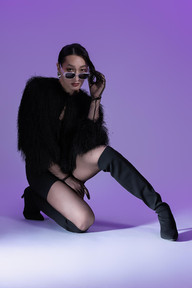
The vision was clear: an Asian model in a blazer wearing knee-high boots standing against a purple background and stark white floor. This was a vision I couldn't sleep on. I had to complete it before the end of 2025. But how? This vision didn't exist yet. All of my Pinterest searches to create a mood board lacked the essence of what I saw. I turned to technology, Midjourney to be exact, to showcase my vision to my team. In a small space like my basement studio, I needed a precise understanding of light and placement to achieve something like this, and not to mention 4 lights! Watch me break down my process.

Visualising the Concept Before Shooting

Before I could look for a team, I needed to get the concept down pat. The vision was so clear that I needed to enter the correct prompts in Midjourney to capture the idea. After a few attempts, Midjourney put together EXACTLY what I was looking for. The vision in my head now was a visual mood board that everyone could see.
Define the mood: I wanted an edgy shoot and bright saturation.
Select colours: The purple was a standout colour against the white floor.
The Focus: I wanted the focus to be on the boots. That was the edgy piece of the puzzle
Plan light direction: This is where things got complicated. How to flood the entire scene purple but maintain saturation with the white floor?
Having a strong concept helped me stay focused and make efficient use of the limited space.
Setting Up in a Small Space
I reviewed the AI-generated and tried to figure out how I would maximize my studio for this type of light setup. I think maybe divine timing worked out in my favour. I opened a tube knowing I had a larger colour gel. Want to guess what colour it was in there? I ended up cutting it in half and covering two lights on either side of my backdrop with the gel.
Used grids: Except for the two lights on either side of the background, the main light on the model and the floor light needed to be gridded to prevent desaturating the purple gel.
Position lights strategically: Two lights were placed raking against the backdrop. A gridded beauty dish near the model's face, and the gridded floor light was angled away and towards the floor.


This setup created depth and dimension without killing the saturation of the background, giving the scene a high editorial look.
Choosing and Using Colour Gels Effectively

Working with colour gels is a delicate balancing act. Gels only truly live in the shadows; if you overexpose an area, you wash out the colour. I had to be incredibly precise—if I blasted the floor with too much light or let the beauty dish spill, that deep purple would have vanished. It was all about protecting the shadows, keeping the colour rich. That's why I decided to regrid most of the lights.
Colour gels are thin sheets of colored plastic that fit over lights to change their colour output. They can dramatically alter the mood and tone of a photo.
Test before shooting: I took quick test shots to see how the colours interacted on the subject and background. I would adjust and change the position of the lights until I found the perfect positioning. This was my first time doing something this complicated, and I did not want to mess it up.
Using gels creatively helped me transform my simple studio into a luxury fashion studio, and no one would know!
Managing Light Intensity and Shadows
In a small space, controlling light was crucial to avoid too many harsh shadows and overexposed areas.
Adjust power: Adjusting the light power on the floor light made it easier when the model was wearing white boots, preventing overexposing the shot.
Adjusting distance & feathering: Adjusting the distance of the floor light, as well as the main light, made the hot spot less noticeable.
Watch shadow placement: Shadows added drama, but had to fall in the right spots to enhance the composition. This meant I angled the beauty dish off to the side, either for split lighting or Rembrandt style.
Compressing the scenes: The model was tall, and I wanted to get the full length to support the concept. I used a higher millimetre and stepped back further to compress the scene and get everything in.
Balancing light and shadow brought the vision to life with depth and texture.
Practical Tips for Small Space Photoshoots
Here are some actionable tips for photographers working in tight spaces:
Plan your layout: Sketch your setup before bringing equipment into the room.
Control ambient light: Block windows or use blackout curtains to avoid colour contamination.
Experiment with angles: Shooting from different perspectives can maximise the impact of your lighting.
Feather the light: Move the hot spot away from the model to create some depth and eliminate the hot spot
Keep it simple: Avoid overcomplicating the setup; focus on key elements that support your vision.
Use mm as your friend: If you need to compress the scene, use a higher milimeter and step back.
Reflecting on the Final Results
The photoshoot exceeded my expectations. My vision became a reality. My small space was capable of more than I gave it credit for. All it needed was just careful control and understanding of light. The colours enhanced the mood, and the shadows added mystery, exactly as I had imagined. I got that editorial and high-fashion feel I was hoping to achieve. With thoughtful planning and experimentation, even a small room can become a powerful studio.
Thanks to the team:
Creative Director, Photographer & Retoucher: Nirvaani Singh @studionirvaani
Model: Eden Tekwa @edentekwa
Hair and Makeup by: Rhythm Malhotra @artistrybyrhythm
Wardrobe Styling by: Olena Rymar @rymar.olena